Showing posts with label Dessert. Show all posts

Monday, 31 August 2015

Winnie The Pooh Deco Sweet Potatoes Steamed Buns

Oh no..... I can't helped it ever since I made deco steamed buns few days ago ^_^ This round I followed the recipe book for the ingredients to made "Golden Mini Buns" but I changed into "Pooh Deco Sweet Potato Steamed Buns with Red Bean fillings" Yup! Red bean fillings again!!! My kids like it a lot especially my elder son loves to eat his breads/pao with red bean fillings :D

The above photo that I shared at my FB/Instagram. Looked at it.... I still need to practice more for my Winnie the Pooh details =_=" Especially the details that I should have cut the lines into fine lines! It will look much better :D 

Sorry to said that I didn't take any tutorial photos due to my sticky hands while kneading the dough :D 
Anyway, I'm not a professional :D but I managed to took few shots after I shaped it with red bean fillings and the details ^_^ 

Here's the closer look before I bring all my Pooh Deco Pao to steams ^_^ 

After steamed it! 

Ta-da!! I hope you will like my "Winnie the Pooh Deco Sweet Potato steamed buns"

Recipes by Agnes Chang's "Tasty Temptations" book 
Dough:
  • 1 tsp yeast*
  • 2 tbsp warm water*
  • 1/2 tsp sugar* 
  • 300g plain flour, sifted (I used pao flour)
  • 1/2 bowl mashed orange colour sweet potatoes
  • 50g castor sugar
  • 1 tbsp butter
  • 90ml water
 *mixed, let it stand for 10 minutes till foamy

Fillings:
1 bowl bean paste/lotus seed paste, formed into 20 small balls (recipe book stated)
But I made used of my leftover red bean paste as fillings and mad about 10 balls @20g each ball

Method:
1. Dough: Mix and knead all ingredients to form into a smooth and pliable dough. Cover and leave aside to prove till double its size. Knead again and rest for 15 minutes. Divide into 20 portions and form into small balls. (Note: I divided into 10 portions balls and the balance dough I mixed with charcoal powder for the details. Please take note that the balance dough left a lot due to I only made 10 portions for Pooh)

2. Use 1 piece of skin dough to wrap up 1 portion of fillings to get a mini pao. (Note: I pull out small portion for Pooh ears before I wrap up 1 portion of fillings). Please view the photo above.

3. The balance dough mixed with charcoal powder to make Pooh details. You may pull part balance dough for black colour dough as I ended up balance black again =_=" (I just made plain black mantou since is the leftover) so that you can make other mini panda deco mantou too!

4. After adding the black details (view the above photo) and leave to prove 15-30 minutes.

5. Steam over high heat for about 5 minutes. Remove and serve hot.


Friday, 28 August 2015

Homebaked Panda Deco Steamed Pao & Hello Kitty Mantou

I made these cute panda steamed pao yesterday ^_^ Inspired by dear talented "婉婉午茶" or "wanwantea" blogs that she made super cute "Panda Steamed buns with Black Sesame Fillings" and many more yummy creations. She updated her tutorial very details and I just follow it but please note that the blog is in Chinese. Click HERE to visit her "Panda Steamed Buns" Anyway, I followed her tutorial but still have balance dough :p Opps....not sure where went wrong so I just created the balance dough into mantou :D 
Here's the close up "Panda Steamed Pao with red bean fillings" I didn't followed Wanwantea black sesame fillings as I still have leftover red bean fillings at my fridge. So I just replaced the pao with red beans. To make black colour, I mix the original dough with charcoal powder and the pink colour just mix the original dough with food gel. 
All together have 6 Panda Steamed Paos with red bean fillings ^_^ I decorate few pandas with ribbons :) Is pretty fun making them and I think getting addicted to make more! Hahaha

Well, I made the balance dough into two mini Hello Kitty mantou and spiral black/pink mantou ^_^

I hope you like today's sharing post and thank you for visiting. Have a lovely Friday!  

Friday, 7 August 2015

Totoro Black Sesame & Red Bean Pao

Baked again ^_^ This round I make "Black Sesame & Red Bean Steamed Totoro Pao" The recipe book is normal round steamed buns but I thought of adding two ears to make into Totoro :) The red bean paste I just bought the ready packet at our local bakery shop. I'll share the recipe after the post or you can purchase the recipe book "Nyonya Kuih Passions" by Andrew Kow (ISBN: 978-967-5114-01-5) This is my first attempt tried out this recipe :)
I must said that after steamed the pao, it smell wonderful and nice texture ^_^ I will definitely steamed again and try out other designed :D 
 
I didn't knead another original dough for the Totoro (white part) or else will look nicer ^_^ I just decorate three Totoro with melted white chocolate and chocolate for the details. The recipe altogether can steamed about 12 Totoro and 3 mini ones without red bean fillings but if you don't make into Totoro shape should able to make more than 12 :D

Here's the recipe:

Ingredients A
  • 450g       self raising flour
  • 70g         sugar
  • 2 tsp       baking powder
  • 50g         black sesame powder
  • 50g         shortening (I used unsalted butter)
Ingredients B
  • 1 tbsp    instant yeast
  • 300ml    warm water
  • 2 tbsp    flour
  • 1/2tsp    sugar
Fillings
  • 500g     red bean paste
Method:
  1. Mix ingredients B till well combined. Set aside for 10 minutes. Add ingredients A and mix well to form a smooth dough. Set aside for 20 minutes (Note: I cover with a piece of damp cloth and let rise and also after 20 minutes I add the ingredients B slowly into ingredients A instead of follow the instruction and I didn't pour all as I saw my dough was enough after pour bit by bit)
  2. Divide the dough into 40g each. Wrap fillings and shape into balls. Set aside for 25 minutes. (Note: I divide red bean paste into 40g each as well so about 12 balls, the last ball paste slightly smaller so I just adjust other balls)
  3. Boil some water in a steamer and steam the Pao for 10 minutes. (Note: wrap towel around lid to avoid water from dripping onto pao)
  4. Serve. 


Monday, 3 August 2015

Butter Cinnamon Pull-apart Breads

After baking the Rilakkuma Pull-apart bread, my kids request more ^_^ So this time I search for other recipes books at home and found this "Butter Cinnamon Roll" recipes looks yummy but I change to make as pull-apart bread instead of individual roll. Haha....still presentable! 

Look at the soft and fluffy texture of my home-baked bread ^_^ Since I don't have time to decorate the top part as any characters, I just add Fuchico Hello Kitty for extra cuteness!

Below is the Butter Cinnamon Roll recipes but I changed to other ingredients ^_^

Ingredients A: 
  • 280gm     Bread Flour/High Protein Flour
  • 15gm       milk powder (I use soymilk powder)
  • 2.5gm      bread improver
Ingredients B:
  • 60gm       castor sugar
  • 1/2tsp      salt
  • 70gm       water
  • 6gm         instant yeast
  • 100gm     fresh milk (I use soymilk)
Ingredient C:
  • 50gm      butter
Method:
  1. Combine A and B to forms almost a dough or you can use bread maker machine under "dough" setting.
  2. Add in C beat until it form a fine dough. (I add the butter after saw the bread maker machine mix into a dough form).
  3. Leave to prove for 30 minutes or if you use bread maker machine just wait until the "dough" setting done.
  4. Keep in freezer for 15 minutes. (I skipped this part)
  5. Roll in flat sheet (sprinkle some flour on table top while roll) apply with butter, sprinkle with cinnamon powder and castor sugar. Roll up. (I skipped adding the castor sugar)
  6. Cut into 8 sections. Arrange onto 8 inches greased chiffon cake pan. Let it prove double in size by cover with damp cloth. Or you can make 6 individual 10cm greased aluminium foil and let it prove in double size.
  7. Bake at 190ºC 15-20 minutes. 

Here's the picture taken before oven bake after the dough prove double size ^_^ I used my Iphone to captured it :p

Friday, 3 July 2015

Yummy scones

I made these scones yesterday and I followed recipes by Rie's Bento & Cooking. Very easy steps by steps and only few ingredients (that's the best part ^_^). Click HERE to view the recipes and also with tutorial pictures! Love it!

In Rie's recipes have cold milk but I substitute with soymilk. The scones still taste yummy ^_^ 

Nom nom nom... no time to arrange the whole set together with a cup of my Pink Lady Oatmilk. Just took few shots and off for work! 

My family likes this scones recipe and thank you Rie ^_^ Do check out Rie's FB or blog for more yummy recipes and bentos as well! Have a lovely coming weekend!

Tuesday, 10 March 2015

Bento2015#Mar10~Hello Kitty Pancake

I always want to try out making design pancake after saw some talented friends at my Instagram. If you have instagram or FB do check out "Bellchan_cooking_bento" awesome creations! I add the FB link HERE ^_^ 
Since is Tuesday with less foods so I decided to have making pancakes but what an ugly Hello Kitty =_=" Gosh..... I make four pieces but end up only one presentable :p  I think the strawberry Kitty-chan much more prettier! Hahaha...

So long have not make this strawberry Hello Kitty with apple inside. If you have the semi-circle curve tools can easily scoop out the apple and strawberry. Just remove the strawberry then add the apple. Very easy! Lastly add in nori for the details.

As for Hello Kitty pancake, I'm sure some of you can see some tutorial from youtube how make. Just add some of the pancake mixture with cocoa powder. I pour the brown mixture to a sauce bottle so that I can draw out the design. Sorry that I don't have time to do the picture tutorial because all of my bento lunch did it early morning with limited time. No camera man to help me hahaha 

Anyway, I put some kaya jam at the sauce container for her to spread pancakes. Have a lovely day!

Tuesday, 10 February 2015

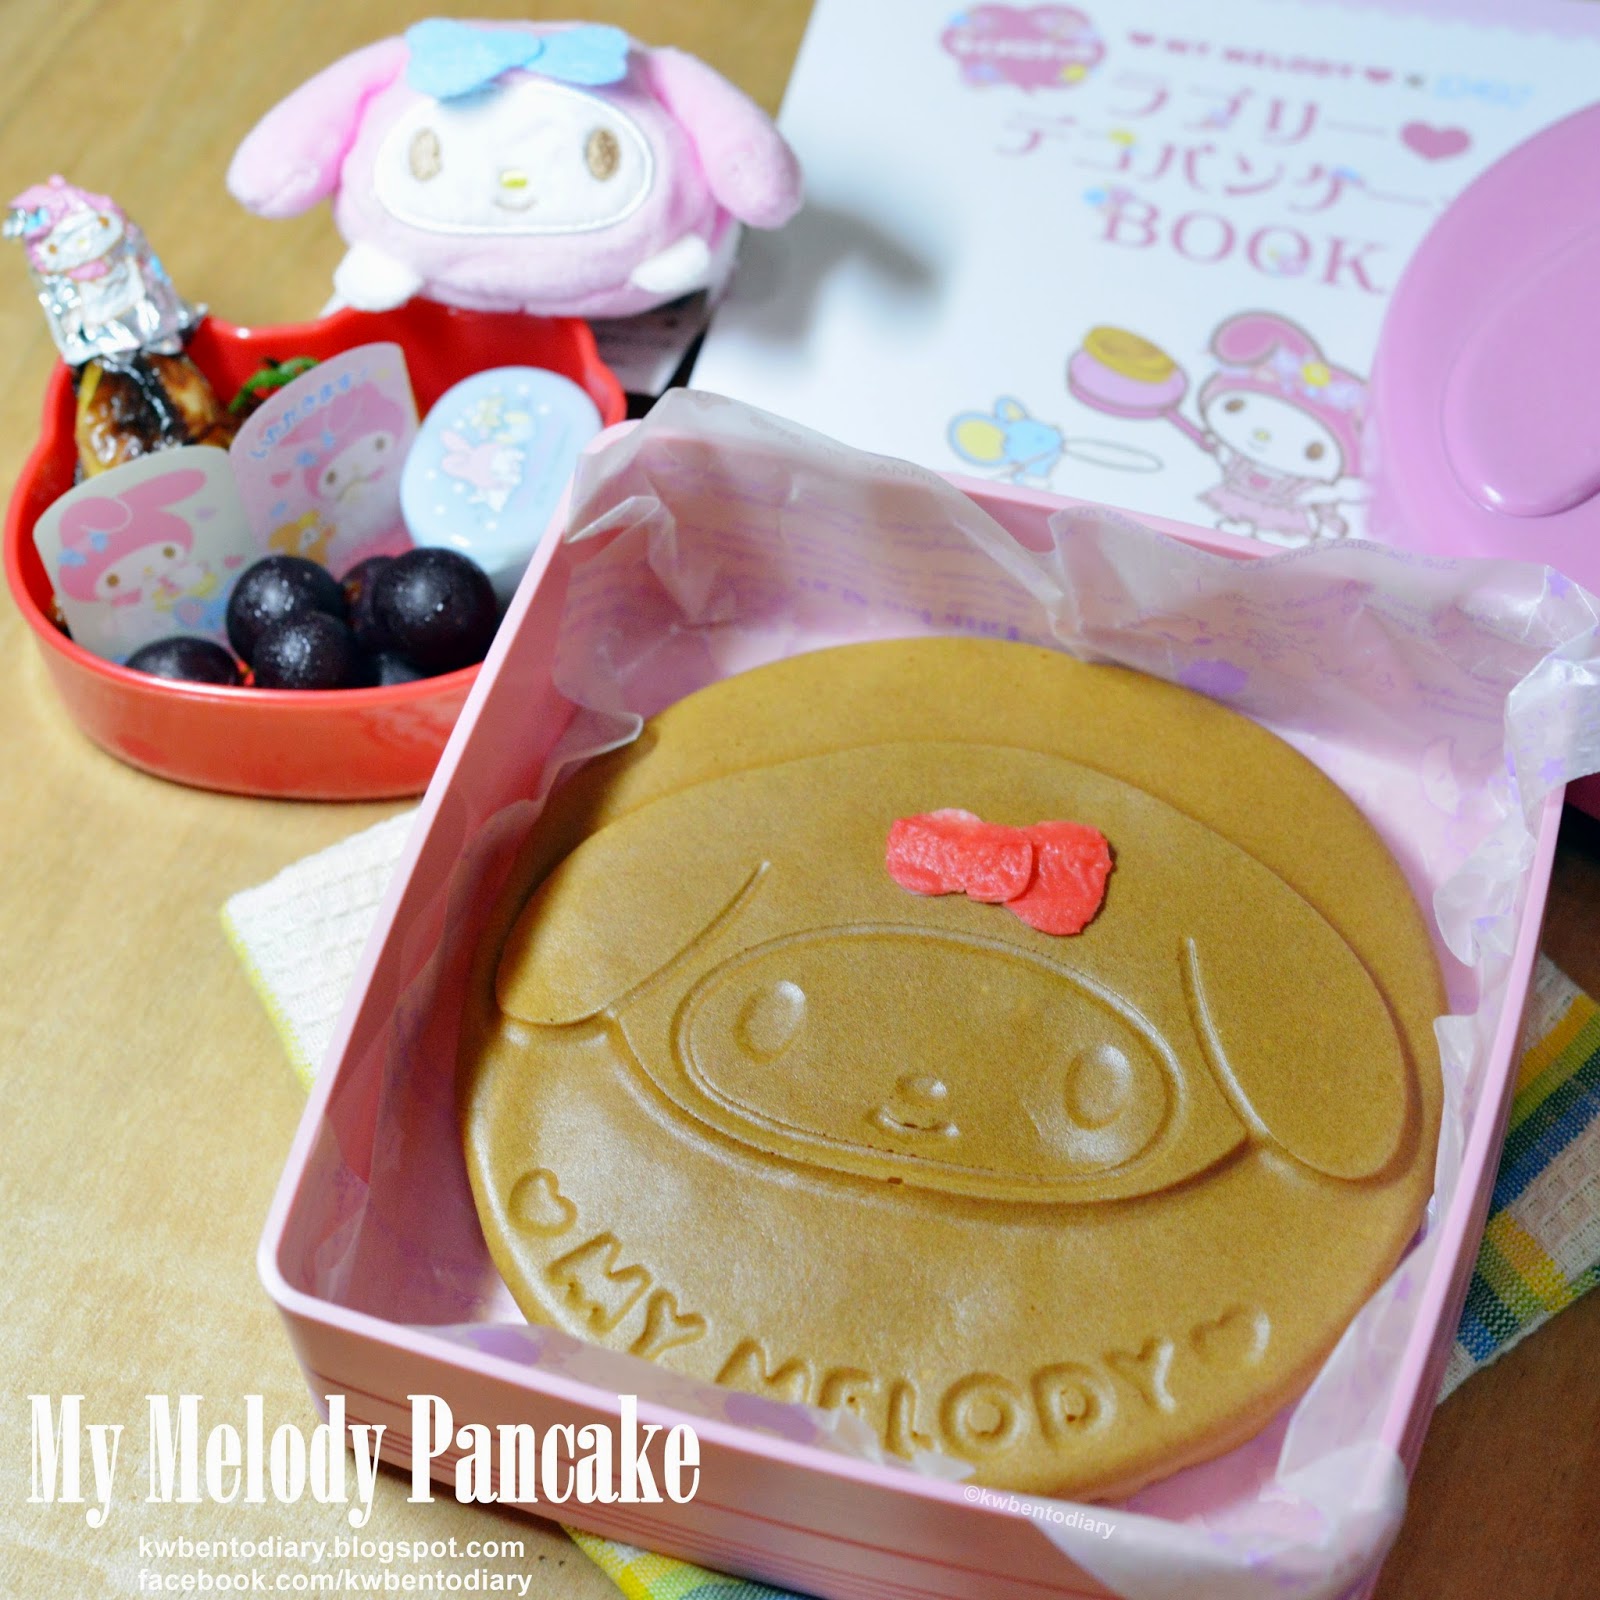
Bento2015#Feb10~My Melody Pancake

Yay! Finally got My Melody pancake pan by the help from my schoolmate who works in Singapore. Felt so blessed that she helped me purchased whenever I need books from Kinokuniya Singapore. I collected during the weekend and my daughter can't wait for Tuesday to come! Hahaha.... it's Tuesday less food for her so I make one and is big! Luckily I have one bento lunchbox that can fits perfectly ^_^ 
 
Here's the close up My Melody Pancake ^_^ Pretty right? 
 
For side dishes have airfry honey drumette, grapes and some honey for the pancake. I hope you like today's post and happy Tuesday! 


Here's the My Melody book that you can get it from Kinokuniya Bookstores. It comes with a recipe book (in Japanese with pictures sadly I can't read =_=") and the pan.

Tuesday, 5 August 2014

Tea break : Black Sesame Pancake芝麻麥煎

Yesterday not working so stayed at home did some baking and cooked lunch for my kids ^_^ If you've missed my yesterday lunch post "Hello Kitty Princess Leia" Just click HERE

Kids helped out making this Black Sesame Pancake芝麻麥煎 for their tea break but after done almost ate it all :D Looks like they can't wait to taste!!! Anyway, I followed this recipe by 厨房一只柴 mobile dodocook多多开伙 App or you can view at this LINK ^_^ I changed the flour to Pancake Mix since I don't have Low protein flour at home as well I didn't add peanut花生 :p So basically just simple ingredients that I'm using with little changes (lack of ingredients at home =_=")

Pancake Ingredients: *Recipe by 厨房一只柴 at dodocook.com
  • 150g    Pancake Mix Flour
  • 1          Large Egg
  • 15g      Castor sugar 
  • 25g      Honey
  • 120ml  Cold water
  • 15ml    Olive oil
  • 1 tbsp   Green Tea powder (optional)
Fillings Ingredients:
  • 1 tbsp   Black sesame powder
  • 1 tbsp   Brown sugar (I don't have black sugar so use brown sugar instead)
Methods: *You can view the tutorial pictures from the link*
  1. Mix egg, castor sugar, honey. Beat until bubbles.
  2. Add cold water then mix well.
  3. Add pancake mix flour then mix well.
  4. Divide the batter half and one half mix with the green tea powder if making double colours pancake.
  5. Low heat non stick pan (I still spray some oil on top), pour 1st half of batter then 2nd half of green tea batter. Cover and maintain low heat.
  6. Mix the black sesame powder & brown sugar.
  7. Wait until the batter have small holes can spread the fillings on top.
  8. Once the bottom batter brown can fold it half to close.
  9. Remove pancake from the pan and let it cool.
 
My first attempt and no matter how it looks, my kids said "YUMMY" and request to make mini pancake with more fillings next round!!! Haha....


Saturday, 12 July 2014

Ugly Caterpillar Steamed Bun

Opps....busy making this caterpillar steamed buns in the morning and I almost give up =_=" Followed the ingredients from the recipe books and still find the dough sticky and hard to roll....argh...afraid adding extra flour will cause the failure result....and yes I did add some and looks like baking not fun at all some times ^__^ Well, I'm lucky that I've 3 lovely people in my life will taste my failure steamed buns especially my sweet daughter said it still cute mummy!!

Here is the closer look of my ugly caterpillars ^_^ Is matcha flavours for green body and strawberry flavours for pink eyes/legs. Dark chocolate for the eyes!! 

Well, hope you like it and have a great weekend dear readers! Hugs!

Thursday, 10 July 2014

Piggies Steamed Cake

Today stay at home with my kids because no school for one day to replace last week Thursday Public Holiday ^_^ So in the morning busy making these cute piggies steamed cake for their tea break later! I did make Hello Kitty designed but didn't turn out well so better don't post it here :D Haha....

To view the recipe can go visit Little Miss Bento's links at HERE

I used smaller silicon cupcakes to steamed. Piggy ears didn't pipe more of it so can't view much =_=" Overall piggies still presentable compare to my Hello Kitty....sigh....

Hope you will have a nice Thursday! Back to do some house chores.....

Tuesday, 1 July 2014

Bento2014#July01~Hello Kitty Ice-cream

Yesterday was a Public Holiday for my kids school so I didn't prepared any bento ^_^ Today back to school and as usual every Tuesday, I packed less food for her lunch! This is one of my to-do-list that I always wanted to made one fine day and here is it....meet my kawaii Hello Kitty Ice-cream :D Saw some of my bento friends had made it at their Instagram so finally my turn to have fun making!

I chose "Selasa" Magnum ice-cream stick for today's bento and filled up some cucumber, korean seaweed and inari into the bento lunchbox. Shape the rice using cling wrap and add the magnum stick as well ^_^ Lastly, cut out nori for Kitty-chan face features details and I love to add eyelashes for extra cuteness!!! Carbstick for ribbon and the nose made from corn.

Fast and easy lunch bento! Hope you like it and happy Tuesday!!! Hugs!

Sunday, 25 May 2014

Apple Roses Puff Pastry 苹果玫瑰起酥派

Recently I found an android app "Dodocook多多开伙" and I installed it ^_^ Now I can easily scrolled through my android phone find recipes but my mandarin little bit rusty....haha... Well, I liked most of the recipes by 主厨Mei and if you want to learn can click from HERE. Very simple tutorial and even I'm not a good baker also can baked :D

I didn't took the step by step while making as this recipes was from 主厨Mei :) I took one picture before let the pastry go to the oven. Notice one different pastry? Haha...that was the cut out pastry so don't waste. There is more cut out balance pastry that I just mixed together and make smaller apple roses. (Picture can be view end of the post)


Here's the close up puff pastry for photo takings ^_^ 


Haha...this is the balance cut out pastry looked like after oven baked! 

Hope you will like today's post & check out 主厨Mei recipes ^_^ Happy Sunday!


Saturday, 22 March 2014

Mantou anyone?? Piggy & Hello Kitty

It's Saturday and why I'm here writing on weekend? Well, just have the "good" mood doing some baking :p Yes, I'm the kind of follow my mood swing on baking...haha....so today I made simple piggy mantou and hello kitty mantou. My very 1st attempt making character design and still need lots of practice to make it better ^_^ Really admire those who can baked and cooked!

 Bought this recipe book quite some time but didn't make the effort of making it =_=" Love to flipped the pages but lack of motivation of doing it compare making bento :D

Here is my Piggy Mantou. The recipe book that I followed was supposely in pink colours for the nose and ears but I don't have the ingredients. So I did some changes by mixing cooked pumpkin for the orange colour.

I tried out making Hello Kitty Mantou as well and didn't turn out pretty :p Well, as long my kids love it and enjoy making together means a whole world to me ^_^ The whiskers I add chocolate rice before steam it and it melts nicely (surprised me) Eye balls were black candy (bought from bakery shop)

Ta-da....end of hard work for today!! Haha....not sure when will I gain back the "good" mood on baking :) Happy Weekend to all! 

Tuesday, 25 February 2014

Bento2014#Feb25~Hello Kitty Pancake

Today's lunch bento very simple and little food :p Due to my daughter requested less food on every Tuesday that they need to practice choral speaking during their lunch break =_=" So I decided to made Hello Kitty Pancake instead of sandwich. I used Cornell Hello Kitty Sandwich Maker to made pancake. Butter at small hk container and cut out some hk apples using cookie cutter :)

Here is the close up Hello Kitty Pancake ^_^ Cute?? Hehehe..... 

I hope you will like it! Have a great day ^_^

Sunday, 16 June 2013

Weekend HK Lunch & HK Cake

Just a simple update for Saturday lunch meal for my daughter ^_^ Once awhile I will let my kids eat instant noodles :p So for her lunch, I cooked Nissin Noodles (Sesame Oil) and add Hello Kitty kamaboko/fishcake. I carve out Japanese cucumber as leave and add sweet taiwanese mini sausage in between. Opps...seems all ingredients unhealthy :p
On Sunday we lunch out to celebrate "Father's Day" but in the morning I still have time to baked a simple small Banana Coffee Cake using Hello Kitty cake mould ^_^ To know the recipe may click HERE as I've shared at my Facebook Page. I am not good at baking as you can see how messy it was the icing sugar =_=" Haha....
Here is the Banana Coffee Cake that I've cut for my family to eat for their tea-break ^_^ Yummy!!


Well, I hope you all had a wonderful weekend with your loved ones ^_^ Happy Father's Day to all Super Dad!! Cheers!