Tuesday, 4 August 2015

Lots of BAYMAX

Simple dinner dishes for my girl ^_^ She loves to eat braised meat扣肉 so I bought one frozen pack from our local shops :p I know.... I need to learn to cook her favourite instead of buying but sometimes really busy to prepare dinner after back from work =_=" So I will use the easy and fastest method "reheat" the frozen pack! Lol! 

Alright back to Baymax! This is super easy to prepare and I'm sure you already know how to do it ^_^ I also make fish balls on a skewer as well tamagoyaki 串玉子烧 all decorate into Baymax.

   
I hope you like this simple foodart ^_^ 

Have a lovely day!

Monday, 3 August 2015

Butter Cinnamon Pull-apart Breads

After baking the Rilakkuma Pull-apart bread, my kids request more ^_^ So this time I search for other recipes books at home and found this "Butter Cinnamon Roll" recipes looks yummy but I change to make as pull-apart bread instead of individual roll. Haha....still presentable! 

Look at the soft and fluffy texture of my home-baked bread ^_^ Since I don't have time to decorate the top part as any characters, I just add Fuchico Hello Kitty for extra cuteness!

Below is the Butter Cinnamon Roll recipes but I changed to other ingredients ^_^

Ingredients A: 
  • 280gm     Bread Flour/High Protein Flour
  • 15gm       milk powder (I use soymilk powder)
  • 2.5gm      bread improver
Ingredients B:
  • 60gm       castor sugar
  • 1/2tsp      salt
  • 70gm       water
  • 6gm         instant yeast
  • 100gm     fresh milk (I use soymilk)
Ingredient C:
  • 50gm      butter
Method:
  1. Combine A and B to forms almost a dough or you can use bread maker machine under "dough" setting.
  2. Add in C beat until it form a fine dough. (I add the butter after saw the bread maker machine mix into a dough form).
  3. Leave to prove for 30 minutes or if you use bread maker machine just wait until the "dough" setting done.
  4. Keep in freezer for 15 minutes. (I skipped this part)
  5. Roll in flat sheet (sprinkle some flour on table top while roll) apply with butter, sprinkle with cinnamon powder and castor sugar. Roll up. (I skipped adding the castor sugar)
  6. Cut into 8 sections. Arrange onto 8 inches greased chiffon cake pan. Let it prove double in size by cover with damp cloth. Or you can make 6 individual 10cm greased aluminium foil and let it prove in double size.
  7. Bake at 190ºC 15-20 minutes. 

Here's the picture taken before oven bake after the dough prove double size ^_^ I used my Iphone to captured it :p

Friday, 31 July 2015

My first Rilakkuma Pull-apart Breads


Today's Rilakkuma pull-apart bread inspired by +Jean Yap recipes. Is like a challenging task for me due to I hardly baked breads! Thankfully the breads turn out well and soft. 

For decoration: I don't have dark chocolate for the eyes so I just used normal chocolate. 

To view the recipe please visit HERE. Do check or follow her at Facebook/Instagram for latest updates. She made awesome bentos as well and I wish I could baked like hers ^_^ By the way, the recipe needs milk and I don't have milk at home so I substitute with soymilk.  


Here comes a snapshot of my daughter holding the bread  ^_^ Love the soft texture! My kitchen smelled great!


I hope you like my Rilakkuma pull-apart bread ^_^ Have a blessed weekend!

Sunday, 26 July 2015

Bento2015#Jul26~Bunny Deco Sushi

Yay! I'm so excited to get one copy of my dear talented and favourite bento food artist Shirley Wong from "Little Miss Bento" ^_^ This is her latest new launched Kawaii Deco Sushi Book that I must said very nice tutorial pictures taken and most importantly in English version :D So where to purchase? You can easily shop at Kinokuniya bookstore at your area or other major bookstores or perhaps purchase online ^_^ For more details can hop over LittleMissBento blog

Since I got the book, I can't wait to practice my deco sushi but sadly didn't turn out as pretty as Master Shirley bunny deco sushi :D Looks like I need more practicing than will improve! I choose to bunny deco sushi among the rest because I like bunny :D   
 
Opps.... look at my first attempt creating big and unbalanced bunny ears =_=" Can you see that I actually making bunny deco sushi? Looks weird right? Hahaha.... 
Oh well, nothing comes easy so I need to practice again to get it correct.  
 
A closer look of my bunny deco sushi :) To make my bunny cute, I add extra lashes :D 

Underneath the bunny deco sushi, I add rice first and cover up with chicken floss. Arrange the deco sushi and some lettuce.

 
My fridge running out of ingredients so I use mashed sweet potato to make carrots! I also cut out some cherry tomato roses and decorate few slices of oranges behind the mashed potato carrots!
 
To match my bunny deco sushi theme, I use Bento&Co "WanWan" bento lunch box ^_^ Look kawaii together right?

Well, I hope you like today's Bunny Deco Sushi of mine ^_^ Have a lovely Sunday!


Wednesday, 22 July 2015

Baymax Deco Sushi

Hello dear readers! I'm taking a long bento breaks since my kids school will reopen end of August ^_^  

I made some Baymax deco sushi for last night dinner since I've time to shaped it after cooked all the dishes. I didn't take picture for it because I don't have extra hands to snap =_=" Well, I'm sure you will understand how I create Baymax based on the photo above or perhaps with my simple explaination below:
  • Create Baymax first! I used cling wrap to shaped a footlong sushi then wrap with nori
  • Mixed colour rice with furikake then spread on top of one full size nori sheet
  • Put Baymax sushi in the middle of the mixed rice then grab hold with your hand and roll or cover up. 
  • Hints: I put cling wrap at the bottom and nori on top then start adding rice. 
Simple dishes: Stir-fried pea sprouts, spam cut into Hello Kitty shaped, pork bone soup with potato and carrots.
 
Do you notice Baymax hard boiled egg? Roll into a ball shaped while the egg still hot (just be careful) So which character you like the most? Baymax or Hello Kitty?

Well, I hope you will enjoy today's post ^_^ 

Thursday, 9 July 2015

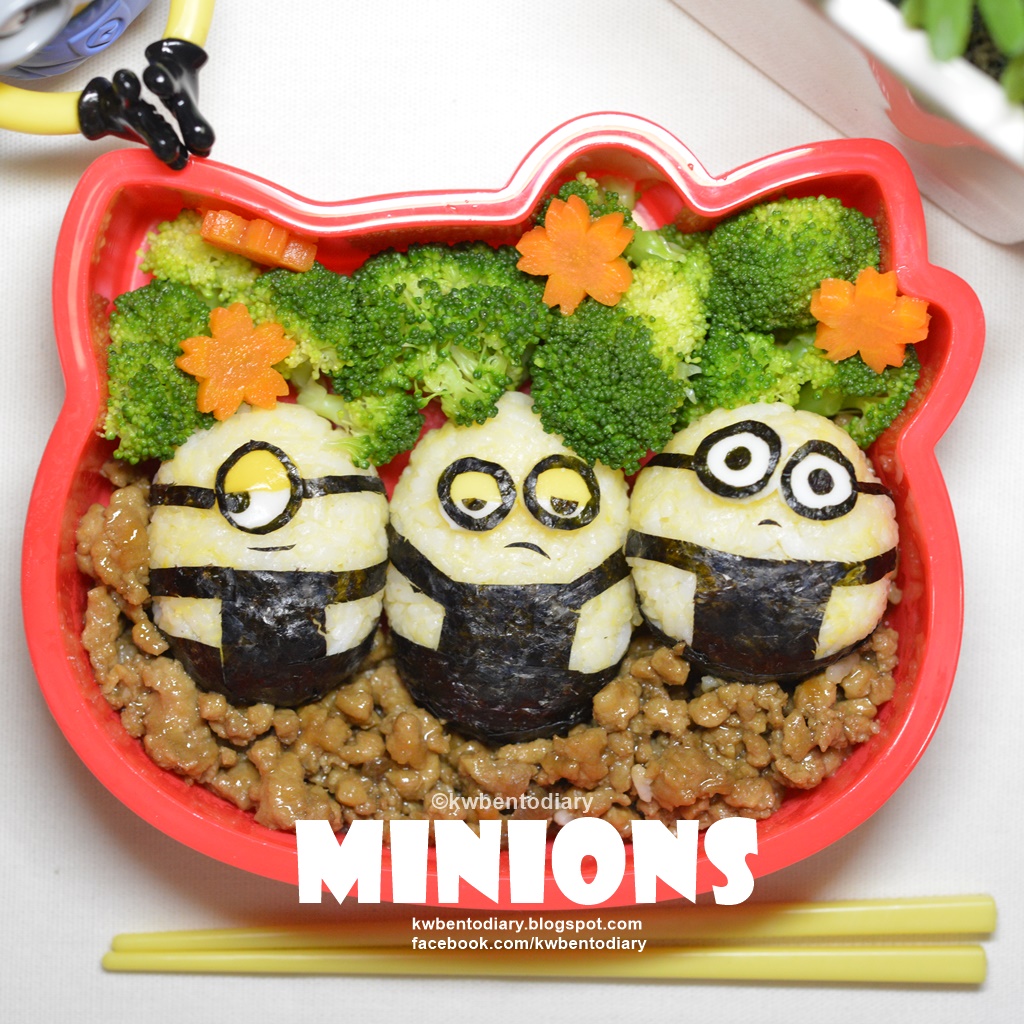
Bento2015#Jul09~Minions

This will be my last bento sharing post because next week onwards is my kids final term school holidays equals to my long bento break ^_^ Woohoo.... I don't have to wake up so early! Today I'm going to share with you this unfinished Minions =_=" Can you spot the missing part? Sigh.... last two days I injured my left finger. My finger got burned and have a huge blister near the nail. Having difficult time on scissor cutting the nori or any other preparation dishes due to the disposable glove. Makes me slow down..... *cry I won't share the disgusting picture of my finger here and at the moment waiting for the blister to burst *ouch. My cute son asked me to use a needle to poke it! Lol! 

Well, back to my Minions. Did you find it? Answer is Minions hair and Kelvin specs =_=" Minions make from egg yolk mix rice and freehand cut out nori details. Minions eyes make from hard boiled egg.   

Honestly, when I update today's blog only noticed Kelvin spec was missing as well as the hairs! Oh gosh....all I did was quickly took few quick shots and pack them up! Didn't think much due to running out of time! Haha....

Well, I hope you like today's sharing ^_^ Happy Thursday and happy long bento breaks to ME. Yay! 

Wednesday, 8 July 2015

Bento2015#Jul07~Sanrio Kirimi

I bought new furikake packet and it's new Sanrio character "Kirimi" salmon fish :D I didn't buy salmon so I create my Kirimi using mashed sweet potatoes. Surprisingly that my daughter prefers Kirimi rather than Gudetama =_=" She asked me to use real salmon instead of mashed sweet potato. Lol! Alright mummy will remember to buy salmon ya!

A closer look of my Kirimi Salmon. I use cling wrap to shape the mashed sweet potatoes and the black part is make of nori. As for the yellow body is hard boiled egg (soak turmeric water). Pardon me for the ugly tomato words :p

For side dishes have pea sprouts, chicken nuggets and mandarin orange.

Took a picture together with the Kirimi Furikake bought it at Aeon Mall and how I wish can get more other variety Japan goods ^_^