Pages

Monday, 31 August 2015

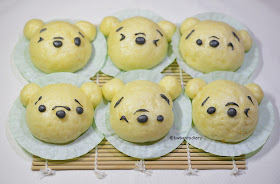
Winnie The Pooh Deco Sweet Potatoes Steamed Buns

Oh no..... I can't helped it ever since I made deco steamed buns few days ago ^_^ This round I followed the recipe book for the ingredients to made "Golden Mini Buns" but I changed into "Pooh Deco Sweet Potato Steamed Buns with Red Bean fillings" Yup! Red bean fillings again!!! My kids like it a lot especially my elder son loves to eat his breads/pao with red bean fillings :D

The above photo that I shared at my FB/Instagram. Looked at it.... I still need to practice more for my Winnie the Pooh details =_=" Especially the details that I should have cut the lines into fine lines! It will look much better :D 

Sorry to said that I didn't take any tutorial photos due to my sticky hands while kneading the dough :D 
Anyway, I'm not a professional :D but I managed to took few shots after I shaped it with red bean fillings and the details ^_^ 

Here's the closer look before I bring all my Pooh Deco Pao to steams ^_^ 

After steamed it! 

Ta-da!! I hope you will like my "Winnie the Pooh Deco Sweet Potato steamed buns"

Recipes by Agnes Chang's "Tasty Temptations" book 
Dough:
  • 1 tsp yeast*
  • 2 tbsp warm water*
  • 1/2 tsp sugar* 
  • 300g plain flour, sifted (I used pao flour)
  • 1/2 bowl mashed orange colour sweet potatoes
  • 50g castor sugar
  • 1 tbsp butter
  • 90ml water
 *mixed, let it stand for 10 minutes till foamy

Fillings:
1 bowl bean paste/lotus seed paste, formed into 20 small balls (recipe book stated)
But I made used of my leftover red bean paste as fillings and mad about 10 balls @20g each ball

Method:
1. Dough: Mix and knead all ingredients to form into a smooth and pliable dough. Cover and leave aside to prove till double its size. Knead again and rest for 15 minutes. Divide into 20 portions and form into small balls. (Note: I divided into 10 portions balls and the balance dough I mixed with charcoal powder for the details. Please take note that the balance dough left a lot due to I only made 10 portions for Pooh)

2. Use 1 piece of skin dough to wrap up 1 portion of fillings to get a mini pao. (Note: I pull out small portion for Pooh ears before I wrap up 1 portion of fillings). Please view the photo above.

3. The balance dough mixed with charcoal powder to make Pooh details. You may pull part balance dough for black colour dough as I ended up balance black again =_=" (I just made plain black mantou since is the leftover) so that you can make other mini panda deco mantou too!

4. After adding the black details (view the above photo) and leave to prove 15-30 minutes.

5. Steam over high heat for about 5 minutes. Remove and serve hot.


Friday, 28 August 2015

Homebaked Panda Deco Steamed Pao & Hello Kitty Mantou

I made these cute panda steamed pao yesterday ^_^ Inspired by dear talented "婉婉午茶" or "wanwantea" blogs that she made super cute "Panda Steamed buns with Black Sesame Fillings" and many more yummy creations. She updated her tutorial very details and I just follow it but please note that the blog is in Chinese. Click HERE to visit her "Panda Steamed Buns" Anyway, I followed her tutorial but still have balance dough :p Opps....not sure where went wrong so I just created the balance dough into mantou :D 
Here's the close up "Panda Steamed Pao with red bean fillings" I didn't followed Wanwantea black sesame fillings as I still have leftover red bean fillings at my fridge. So I just replaced the pao with red beans. To make black colour, I mix the original dough with charcoal powder and the pink colour just mix the original dough with food gel. 
All together have 6 Panda Steamed Paos with red bean fillings ^_^ I decorate few pandas with ribbons :) Is pretty fun making them and I think getting addicted to make more! Hahaha

Well, I made the balance dough into two mini Hello Kitty mantou and spiral black/pink mantou ^_^

I hope you like today's sharing post and thank you for visiting. Have a lovely Friday!  

Thursday, 27 August 2015

Bento2015#Aug27~Tic Tac Toe Hello Kitty

Tic Tac Toe game bento ^_^ So which colour is the winner? I'm running out of idea to create cute creations for the Hello Kitty Thermos lunch box =_=" So this round I thought of making tic tac toe and perhaps she can play with her friend :D Well.....don't think so!!! 
 
Here's a closer look of my Hello Kitty Tic Tac Toe :) I manage to make all yellow into Kitty-chan but the blue ones.....hmm.... only two of them I didn't shape into Kitty-chan  =_=" 

  • Yellow Hello Kitty make of egg yolk + rice
  • Blue Hello Kitty make of bluepea/butterfly pea flower extract + rice
  • Red make of crabstick
  • Black details make of nori/seaweed 
Side dishes have star shaped nuggets, pea sprouts and grapes ^_^

I hope you like this simple Tic Tac Toe Hello Kitty Bento lunch. Have a lovely day!

Wednesday, 26 August 2015

Bento2015#Aug26~Miffy Thermos Bento

Do you like Miffy? Since I'm using Miffy thermos lunch box and I've created Miffy using different ingredients so this round I choose quail egg ^_^ I think is perfect due to Miffy is white colour :D How do I shape it? You just need hold the quail egg and rub palms together after peel away the eggshell while still hot. Easy right?  

A closer look of sweet Miffy quail egg :) I cut half of the quail egg for Miffy head so that will stay firm. Underneath is rice cover up by the sweet minced meat so that Miffy will stand out nicely on top. Cherry tomato for Miffy red dress and nori for details. As for ears/legs also make from quail eggs.
 
Honey cherry tomato, cucumber leave and half of the quail egg from Miffy. 

I hope you like this simple and quick Miffy bento. 

Tuesday, 25 August 2015

Bento2015#Aug25~Kiiroitori Hard Boiled Egg

Cha Soba noodles with Kiiroitori hard boiled egg for quick and simple lunch ^_^ I cut half of the hard boiled after soak the egg with turmeric juice. Each of my kids get half and both of them have the same dishes :D 
 
Here's the close up Kiiroitori hard boiled egg ^_^ Just add nori details and carrot as beak. Arrange the cooked cha soba nicely and add some soy sauce at sauce container.
 
For side dishes have pan-fried prawn coated with breadcrumbs and pea sprouts.

I hope you like this simple Kiiroitori Bento ^_^

Monday, 24 August 2015

Bento2015#Aug24~Back to school Hello Kitty

Hooray! Kids finally back to school after long breaks and I'm back to bento routine. Yawn! What's for lunch? Hello kitty bento using thermos lunch box since is my daughter's favourtie ^_^ 

A closer look of my mini Hello Kitty size that I used cling wrap to shape the head. Underneath just plain rice with meat floss and put Hello Kitty on top. To make pink rice simply mix with sakura denbu and punch out nori for the details. I also added Hello Kitty flakes and I'm happy that our local Aeon Malls selling the few different types of Hello Kitty furikake with mini flakes! Hopefully this good news will remain or else I need to go Singapore to restock =_="

For side dishes have quail eggs and how to shape into Hello Kitty? Simply do it while still hot but be careful :) I even cut out the cucumber using Hello Kitty cookie mould.

At another container I add pandan chicken wraps and milk cabbage奶白菜 

I hope this Hello Kitty Bento will brighten up your day!

Friday, 21 August 2015

Pixar Inside Out Fear Foodart

Yesterday we enjoyed the movie a lot and think I'm "sadness" and emotional for the whole movie :D Overall I rated the movie 8 out of 10. Just certain part of the story I don't quite like it but is good for a laugh as well emotional part..... Anyway, here's my final "FEAR" character for Pixar Inside Out! I made this yesterday dinner foodart ^_^
 
My close up "FEAR" character in purple. I mix the cooked rice with a drop of purple food gel. Next I used cling wrap to shaped it. Freehand scissor cut out nori details! Red bow made from crabstick.
 
Last dinner dishes have pan-fried mackerel, stir-fried capsicum/prawns/carrots/shimeji mushroom and sweet corn soup.

Thank you so much for those of you have followed and reading my "Inside Out" creations. I do hope you like it! My kids school will reopen next Monday and I will back to my bento routine. Stay tune and finger-cross that I able to wake up when my alarm alert me =_=" Have a lovely weekend.

Thursday, 20 August 2015

Pixar Inside Out Joy Foodart

Please bear with me as I still have one last character to make for Pixar Inside Out and the last one seems tricky for me to create =_=" Anyway, I choose "Joy" first since I've left over blue rice.
I reheated the blue rice (last night left over) and the blue colour not as dark as last night :( Honestly, I don't quite happy with my blue hair-do for Joy =_="
To make "Joy" face orange, I add little bit of orange furikake or you may use ketchup ^_^  I need to clear off my furikake packets before expired :D
Freehand scissor cut out nori details and the red lips made of apple skin :)
Egg sheet for yellow blouse and stars decorations.
 
Side dishes have broccoli, shimeji mushroom, gyoza, carrots and egg shaeet stars shaped.

I hope you like my 4th Inside Out creations and hopefully I can make the final character successful ^_^ 

Wednesday, 19 August 2015

Pixar Inside Out Sadness Foodart

I hope you won't get bored of my Pixar Inside Out foodarts ^_^ This round I made "Sadness" blue in colour and I've plenty of blue pea/butterfly pea flower that I stored at freezer so just nice to make it. 
  
Here's the closer look of my "sadness" character :( 
I cooked the rice together with some bluepea flower so that I can get blue rice :D While waiting for the rice to cooked, I freehand scissor cut out the nori details as well prepare the side dishes! When the rice is done, I use cling wrap to shape the head/body. Next add on the face nori details as well the hair. 
 
Side dishes have chicken nuggets, pea sprouts and mushroom soups ^_^

Hope you like my last night dinner foodart and one more day to watch "Inside Out" 

Tuesday, 18 August 2015

Pixar Inside Out Disgust Foodart

Continue making Pixar "Inside Out" emotion ^_^ This round I made my daughter's favourite among five of them "Disgust". She told me she likes her pretty and super long eyelashes :D This foodart was made for last night dinner and hopefully tonight I can make next character (*finger cross) Honestly speaking, I don't quite happy with "Disgust" eyes I made =_=" 

Here's the close up "Disgust" in green. I mixed rice with green furikake for face/body. Green pepper/capsicum so hair and eyes. I added nori for extra touched because I find it too plain and the eyes didn't stand out but still not pretty :( Perhaps I should use nori for the eyes instead of capsicum. Apple skin for red lips.
 
Side dishes have dark sweet sauce ginger drummets and stir-fried spinach ^_^

Hope you like my "Disgust" dinner foodart. So what's next I should make? Hmm.....

Monday, 17 August 2015

Pixar Inside Out Anger Foodart

My kids can't wait to watch Pixar "Inside Out" movie and I had purchased the tickets!  One week to go before the school reopen so I will bring them and enjoy the morning movie on this coming Thursday ^_^ 

Among the five expressions or characters, my girl prefers "disgust"but she asked me why don't I made? I told her one at a time and hopefully can make the rest *finger cross* :D 


My "ANGER" close up kyaraben ^_^ To made red rice, I mixed with red furikake + ketchup, white rice for body and nori for details. 


Spring rolls, veggies and miso bean curd soup for side dishes. 

I edited with extra fire on top for ANGER by using photo editor. I hope you will like it!

Friday, 14 August 2015

Bento2015#Aug14~Gudetama Dinner Bento

This is my last night dinner and I made Gudetama Bento for myself since my girl doesn't like this sanrio character =_=" Just a simple sunny side up egg to create gudetama :D Pretty easy by adding nori details and lay on top of the rice.
 
Here's the closer look of Gudetama and I didn't create the actual shape egg yolk since I just want to made sunny up egg ^_^ Simply freehand scissor cut out nori details and I didn't add the legs :p 
 
Side dishes contain broccoli, carrots and bacon.

Have a lovely weekend!

Monday, 10 August 2015

Hello Kitty Claypot Dinner

Open ceremony my new collection "Hello Kitty Claypot" that I purchased online quite some times ago but now only have time to use it ^_^ This pictures was taken last week Friday but been busy to update it. So here is my simple uncooked dishes photo and this claypot about capacity of 1600ml and just nice for my family :) 

I love the claypot lid! So pretty but if have a mini version would be perfect :D If you happen to know do email or comments below so that I can go search for it ^_^ Thank you in advance!


Here's the after cooked soup and I just add a bowl of cute Hello Kitty rice for photo takings ^_^ Of course I can't finished the whole soup alone. Quickly took few shots and nom nom our  yummy dinner!

To shape the Hello Kitty just simply used cling wrap and add the nori details! The nose made of egg sheet and red bow made of crabstick (red part).  
 
I hope you will like today's sharing ^_^ Have a lovely day!


Friday, 7 August 2015

Totoro Black Sesame & Red Bean Pao

Baked again ^_^ This round I make "Black Sesame & Red Bean Steamed Totoro Pao" The recipe book is normal round steamed buns but I thought of adding two ears to make into Totoro :) The red bean paste I just bought the ready packet at our local bakery shop. I'll share the recipe after the post or you can purchase the recipe book "Nyonya Kuih Passions" by Andrew Kow (ISBN: 978-967-5114-01-5) This is my first attempt tried out this recipe :)
I must said that after steamed the pao, it smell wonderful and nice texture ^_^ I will definitely steamed again and try out other designed :D 
 
I didn't knead another original dough for the Totoro (white part) or else will look nicer ^_^ I just decorate three Totoro with melted white chocolate and chocolate for the details. The recipe altogether can steamed about 12 Totoro and 3 mini ones without red bean fillings but if you don't make into Totoro shape should able to make more than 12 :D

Here's the recipe:

Ingredients A
  • 450g       self raising flour
  • 70g         sugar
  • 2 tsp       baking powder
  • 50g         black sesame powder
  • 50g         shortening (I used unsalted butter)
Ingredients B
  • 1 tbsp    instant yeast
  • 300ml    warm water
  • 2 tbsp    flour
  • 1/2tsp    sugar
Fillings
  • 500g     red bean paste
Method:
  1. Mix ingredients B till well combined. Set aside for 10 minutes. Add ingredients A and mix well to form a smooth dough. Set aside for 20 minutes (Note: I cover with a piece of damp cloth and let rise and also after 20 minutes I add the ingredients B slowly into ingredients A instead of follow the instruction and I didn't pour all as I saw my dough was enough after pour bit by bit)
  2. Divide the dough into 40g each. Wrap fillings and shape into balls. Set aside for 25 minutes. (Note: I divide red bean paste into 40g each as well so about 12 balls, the last ball paste slightly smaller so I just adjust other balls)
  3. Boil some water in a steamer and steam the Pao for 10 minutes. (Note: wrap towel around lid to avoid water from dripping onto pao)
  4. Serve. 


Thursday, 6 August 2015

Bento2015#Aug6~Baymax Bento

I would like to share with you a piece of good news that I had won a Baymax bento box from Candysan Facebook shared post contest few weeks ago! I'm the lucky winner ^_^ I always wanted to have this Baymax Bento Box and couldn't find it during my Japan trip so this prize seem like dream come ture! Woohoo.... 

For those who are looking for Baymax bento box like me, go visit Candysan online shop HERE. Please note that I just share info and I don't earn any profit from them.
  
Here's my close up Baymax health care <3  I shaped the rice using cling wrap and add in the nori details ^_^
 
For side dishes have stir-fried spinach, fish ball on skewer, tamagoyaki and braised meat.
 
I hope you will like today's ahring Baymax Bento and matching lunch box ^_^ 

Hehehe..... I must thank you Candysan once again here for chosen me as a winner!